

You're standing beside your board, looking at a fresh rail crack and wondering whether it'll be ready for the weekend. Maybe it happened in the shorebreak. More likely, from what customers bring to our attention, it happened against a doorway, while unloading the car or when the board slipped onto something hard. Before you reach for resin, work out whether you've got a small sealing job or damage that needs a repairer.
Why Surfboard Repair Is Worth Doing Yourself
A small, clean ding is worth taking seriously without assuming the board is finished. If the surrounding laminate is sound and the damage hasn't compromised the structure, a suitable home repair can be a sensible way to keep using equipment you already own.
The important distinction is between restoring a local damaged area and disguising a bigger problem. A tidy-looking surface doesn't prove the foam underneath is dry or that loose fibreglass has bonded again.
Save the board, not just the next session
There's an environmental reason to repair rather than replace. Conventional surfboards made from polyurethane foam and fibreglass aren't biodegradable, and Sustainable Taranaki's guidance for surfers identifies repair, reuse and upcycling as alternatives to landfill.
That doesn't mean every damaged board deserves an ambitious home rebuild. It means a minor crack shouldn't become the reason an otherwise usable board gets discarded. If a board is beyond practical repair, repurposing it as shelving, furniture or art remains an option.
Think of a small rail impact found while packing the car. If you stop, assess it and choose the right repair, you're making a different decision from smearing resin over it while the wetsuit is still wet. The first approach protects the board; the second prioritises getting out quickly without knowing what's underneath.
Practical rule: A home repair is worthwhile when you understand the damage, know the board's construction and can prepare the area properly.
Set a realistic target
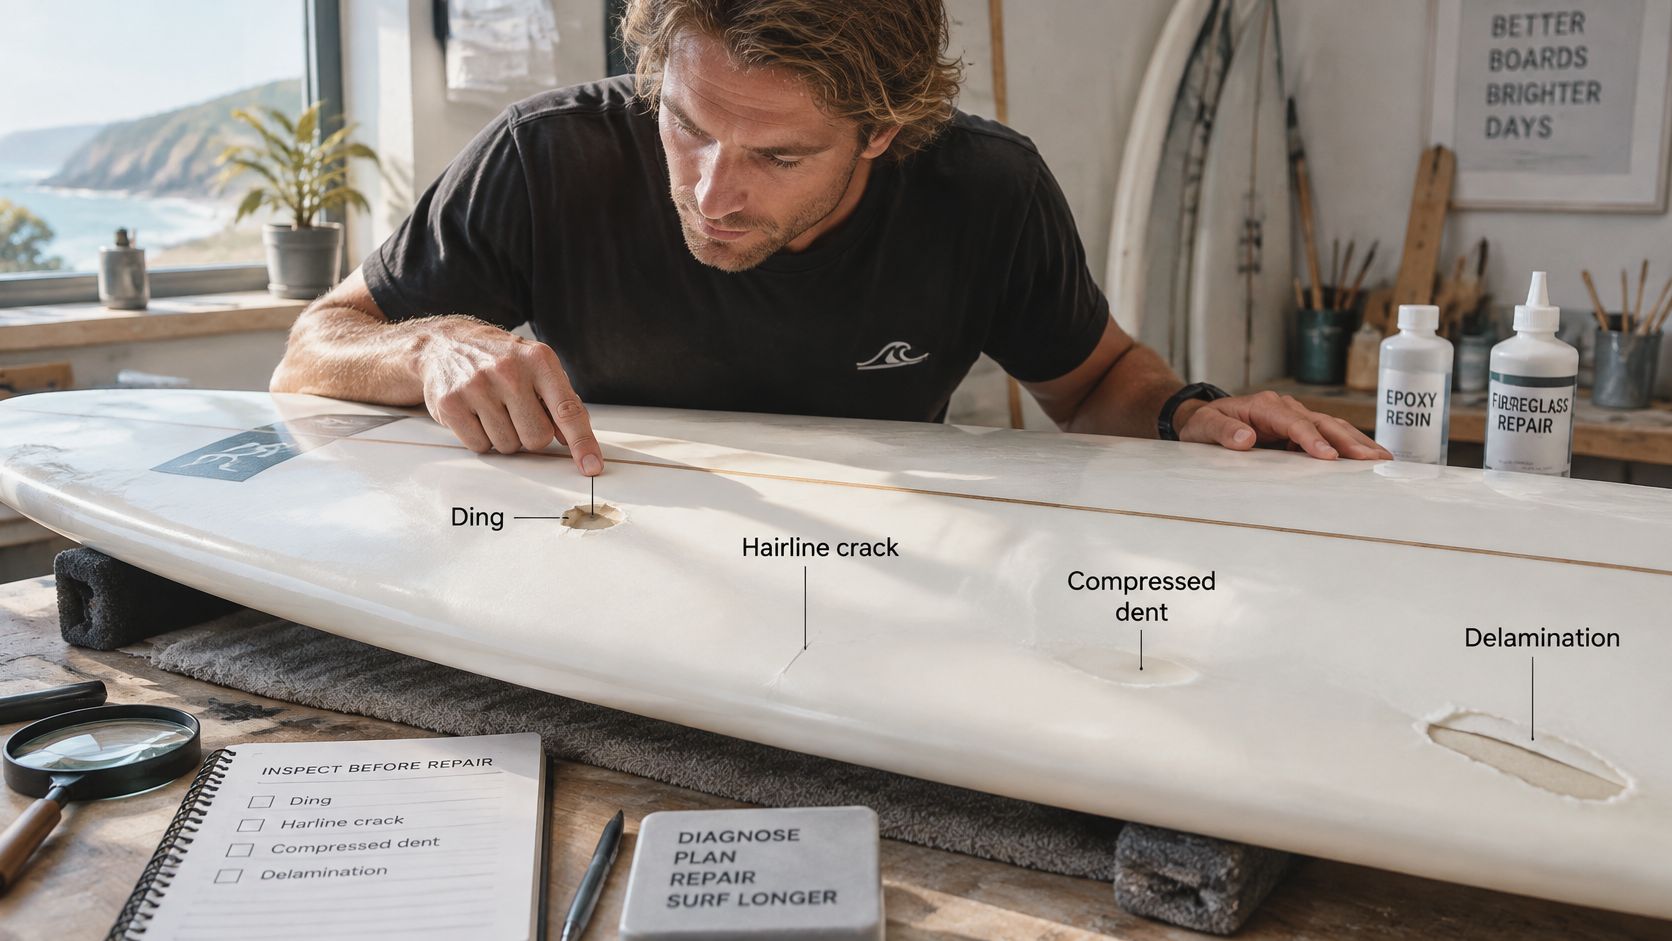
The main damage categories call for different decisions:
- Dings are local impact damage that may break the outer skin.
- Cracks need assessment for depth and movement, not just length.
- Pressure dents may leave the skin intact despite compressed foam beneath.
- Delamination means separation within the board's layered construction.
From our shop's perspective, the useful skill isn't making every repair invisible. It's knowing which jobs you can complete reliably and which ones you shouldn't start.
We sell repair kits rather than carry out surfboard repairs. Small, non-structural damage can be a home job; structural work needs professional judgement. That boundary matters more than whether you can colour-match the finished patch.
Diagnosing Dings, Cracks, Dents and Delamination
Inspect before sanding. Removing material too early can hide the original damage pattern and make a straightforward assessment harder.
Start with the whole board, not just the mark that caught your eye.
Read the shape of the damage
A ding usually has an identifiable impact area: chipped glass, a small hole or a crushed spot. A crack may look less dramatic, but check whether it's confined to the finish or continues through the laminate.
A pressure dent looks more like a depression than an open wound. The foam beneath has compressed, but the skin may remain unbroken. Delamination is different again: look for bubbles, lifting cloth or an area that feels noticeably soft compared with the surrounding deck.
- Look for moisture: Dampness and discolouration around an opening deserve attention.
- Check the perimeter: Damage may extend beyond the most visible chip.
- Compare nearby areas: A change in firmness can be more informative than the surface appearance alone.
Don't repeatedly flex a suspect area to test it. If the damage moves or the extent isn't clear, stop the inspection rather than opening it further.
If you're uncertain about the board's construction, our guide to surfboards in New Zealand provides broader board-selection context. Confirm the actual model's materials before choosing resin.
Your triage question is simple: is this clean, local surface damage, or does it reach the core or affect the structure? If you can't answer confidently, get it assessed before opening a kit.
Choosing Tools, Materials and a Repair Kit
Choose the repair system after identifying the board, not the other way round. A conveniently sized tube isn't useful if its resin is unsuitable for your construction or the damage needs reinforcement that the kit doesn't provide.
At Blitz Surf Shop, we sell solar-cure repair kits and repair essentials, not a repair service. We can help you choose from our surfboard repair range in-store or online, and recommend the Boardroom in Gisborne when the job needs professional work.
Repair options at a glance
| Repair option | Best suited to | Main trade-off to weigh |
|---|---|---|
| Compatible solar-cure kit | Small, clean, dry, non-structural dings | Convenient and rapid, but not a substitute for structural restoration |
| Traditional epoxy and fibreglass setup | Suitable local repairs needing controlled filling and cloth application | More preparation, mixing and finishing |
| Professional repair | Structural cracks, delamination, fin-box damage and core work | More expense and time, balanced against the board's condition and value |
Solar-cure products suit surfers who want a straightforward option for an appropriate minor repair. Rapid curing doesn't remove the preparation work, and it doesn't guarantee that a board is ready for the next session.
A traditional setup gives you more control over filling and reinforcement, but also more opportunities to get the mix, cloth application or finish wrong. For substantial damage, buying extra materials isn't necessarily better value than paying someone who understands laminate restoration.
Lay everything out before starting
Your working kit should include:
- Preparation tools: A wax scraper, sanding block and masking tape.
- Abrasives: Paper suitable for initial levelling and finer wet-and-dry for finishing.
- Repair materials: Construction-compatible resin, fibreglass cloth and filler where needed.
- Protection: Gloves, eye protection and suitable respiratory protection.
- Application supplies: The mixing and spreading tools specified by the repair product.
Check what the kit contains. Don't assume cloth, abrasives or protective equipment are included because the packaging calls it a complete repair solution.
Spend according to the job. A modest local repair and a damaged fin box aren't competing uses for the same tube of resin.
Fixing Dings and Cracks Step by Step
Work through a minor repair in order. Each stage needs a check before you move on, especially when the board has been in the water since the damage occurred.
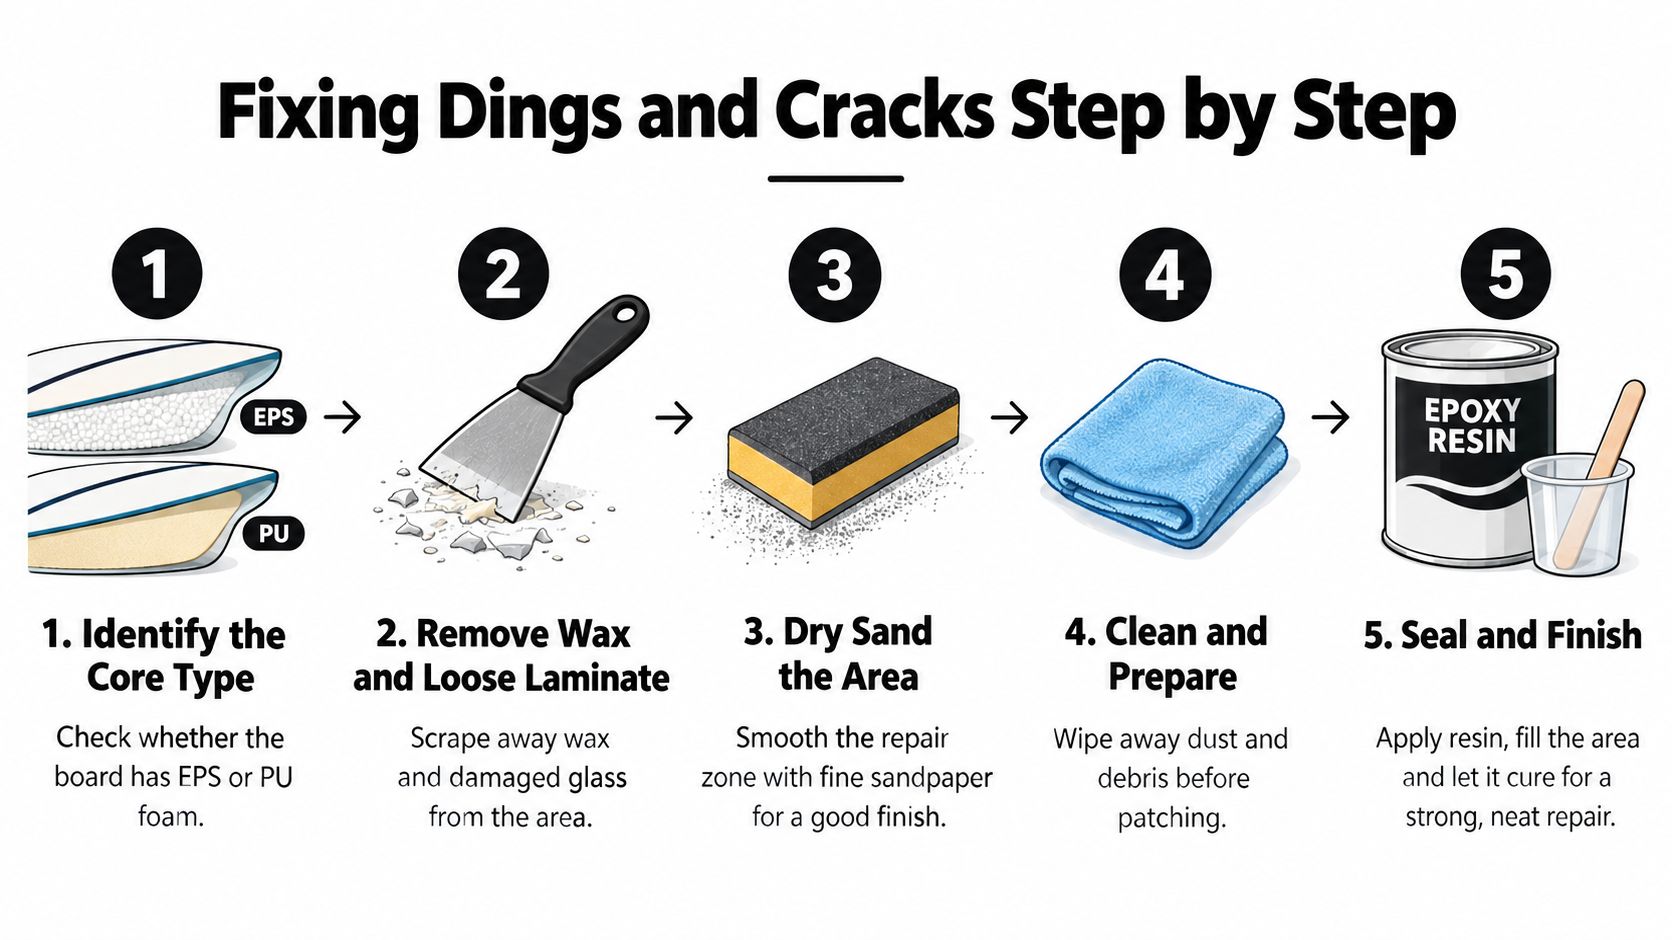
Use this process graphic as an overview, not a replacement for the repair product's directions.
Identify, expose and dry
- Confirm the construction. Establish whether you're working with EPS/epoxy or polyurethane/polyester. EPS needs epoxy resin because polyester can chemically attack polystyrene. Check the board information and product compatibility before proceeding.
- Remove contamination and loose material. Scrape away wax before sanding so you don't work it into the repair zone. Remove loose or frayed laminate carefully, stopping if the damaged area is larger than expected.
- Let trapped water escape. Keep the board in a shaded, ventilated place with the damaged area positioned to drain. Don't apply resin while you can still see or feel dampness, and don't use surface dryness as proof that a soaked core is ready.
- Sand back to firm material. Feather the perimeter into sound laminate and remove sanding dust. Your check is a clean, stable repair zone without lifting edges, loose fibres or remaining wax.
Fill, reinforce and finish
For depth guidance, a srfboard comany's ding repair guidance distinguish shallow repairs under about 2 mm, where local fibreglass and resin may suffice, from damage around 5 mm deep, which generally needs compatible filler before one or two pre-cut fibreglass layers. Those are preparation guidelines, not automatic approval to repair every deeper impact at home.
- Restore the contour where appropriate. Use the compatible filler specified for the system rather than trying to bridge missing material with a thick puddle of resin. Dry-fit any cloth so it overlaps sound laminate.
- Apply the repair. Wet cloth fully from the centre outwards and remove excess resin. For a suitable solar-cure product, follow its preparation, application and exposure instructions exactly.
- Let it cure, then level it. The same guidance cites around 150 grit for flattening, followed by finer wet-and-dry paper for finishing. Sand the patch level without cutting through its reinforcement.
If you're considering the Simple Patch Surfboard PU Repair Patch, confirm that its stated compatibility and application suit your board. A product name isn't a substitute for checking the instructions.
Before returning to the water, inspect the perimeter for gaps, lifting and unfinished edges. Looking neat is the final cosmetic check, not the only repair check.
Handling Pressure Dents and Delamination Safely
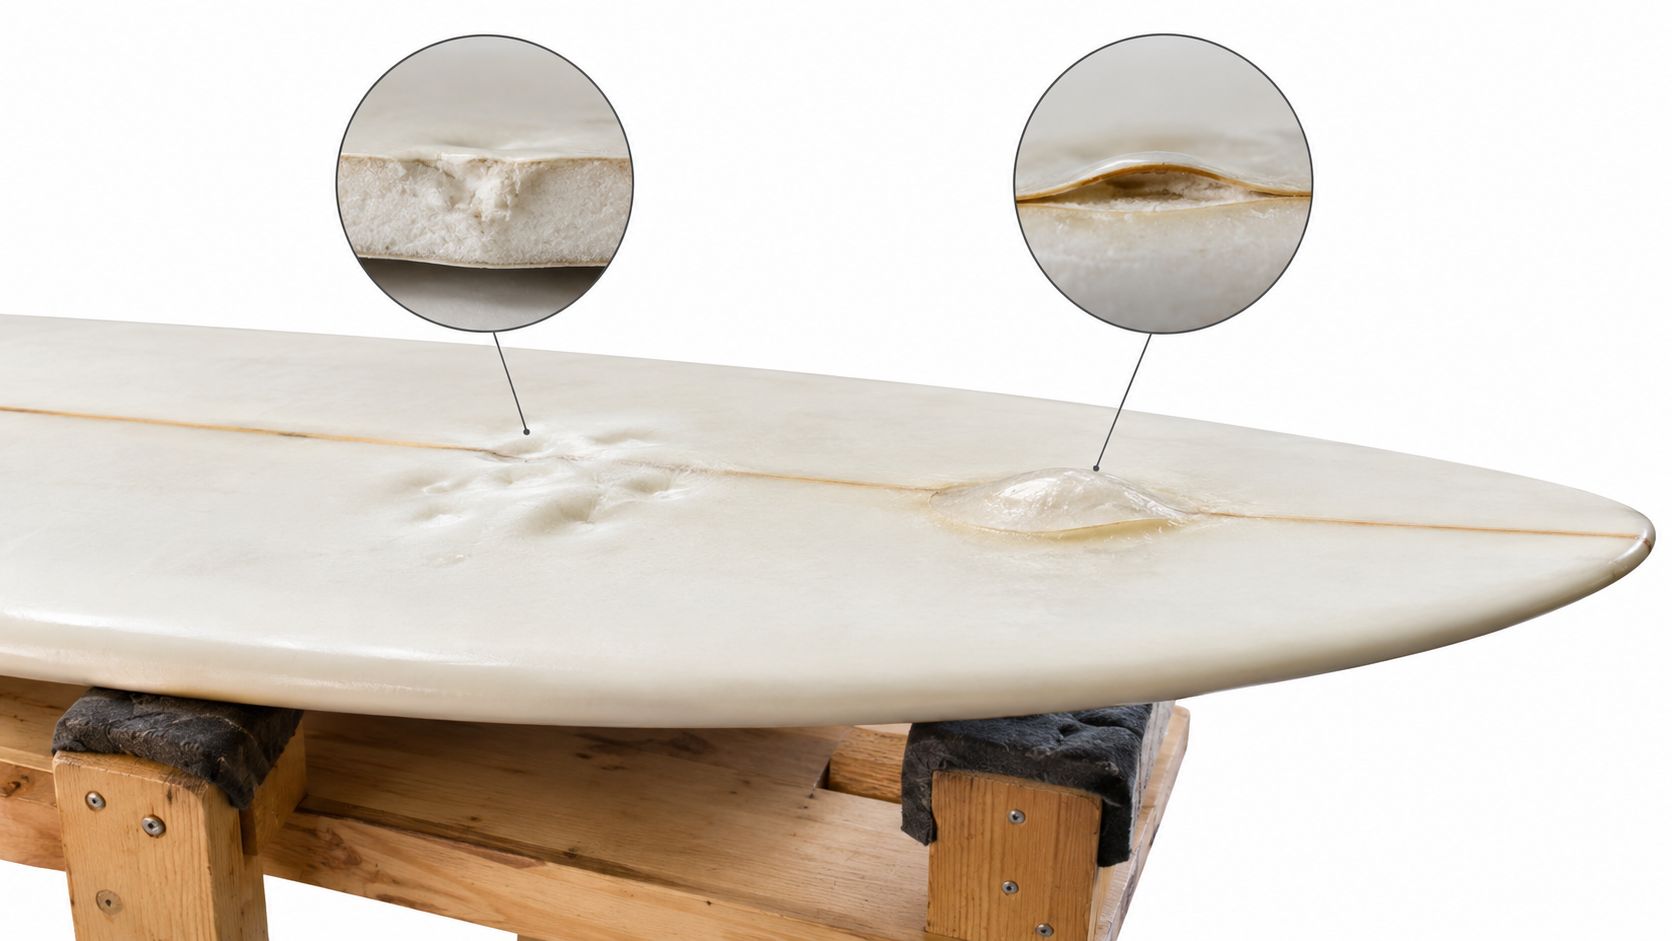
A depression and a bubble may sit close together on the deck, but they don't necessarily need the same treatment. The first question is whether the outer skin remains intact; the next is whether the underlying layers still support it.
A surface coating won't reverse crushed foam or reconnect a separated laminate.
An intact dent isn't an invitation to cut
A stable pressure dent with unbroken glass doesn't automatically need filling. Cutting into sound skin just to improve its appearance can turn an inspection issue into a repair job.
Treat cracked, crushed or unusually soft areas differently. Those signs raise questions about support beneath the laminate, not whether the surface needs sealing. If the deck feels detached over a broader area, covering it with resin won't address the separation underneath.
A hard surface patch can hide a soft structure. Judge the repair by what it restores, not just what it covers.
What laminate restoration involves
The epoxy softboard repair guidance from Surf Industries supports construction-specific methods, including opening a bubbled deck only enough to inject an EPS-safe adhesive. Its guidance also addresses lightly abrading a slick repair surface and using hard-curing epoxy.
That's a controlled method for appropriate construction, not a general instruction to puncture every bubble. The adhesive, access and way the layers are held together all need to suit the board.
Professional-quality work may involve compatible epoxy or polyester resin, multiple fibreglass layers, filler shaping, a sealing hot coat and colour blending. The purpose is to rebuild the damaged composite, rather than leave a waterproof smear over it.
A waterlogged board shouldn't be closed immediately. Trapped moisture can interfere with adhesion and contribute to renewed separation, so a repairer needs to establish the condition beneath the skin before sealing it.
Recognise the limit of a kit
Ask for professional assessment when you find:
- Spreading separation: A bubble or lifted area extends beyond a small local spot.
- Unstable laminate: Glass moves, lifts or feels unsupported.
- Damaged support: Crushed or missing core material affects the board's shape.
- Uncertain construction: You can't establish which adhesive and method belong on that board.
Don't buy a bigger kit to avoid making that decision. Some boards need an assessment before anyone can say whether a lasting repair is worthwhile.
Safety and Cure Conditions to Get Right
Set up the workspace before opening resin or making dust. You need room to support the board securely, keep materials organised and leave the repair undisturbed while it cures.
The preparation guidance used earlier also warns against repairs below 10°C, when curing and bond reliability can deteriorate. Check the product's own operating conditions rather than treating a bright day as proof that the workspace is suitable.
Protect yourself and control the workspace
Use gloves, eye protection, ventilation and suitable respiratory protection for the task and product. Sanding dust and resin work need different controls, so follow the safety information rather than assuming any face covering will do.
Keep the board immobilised during application and cure. If you have to pick it up repeatedly to clear the bench, the workspace isn't ready.
For product-selection context, our UV resin guide for New Zealand can help you understand this repair category. The instructions supplied with your actual resin remain the reference for exposure and return-to-use requirements.
Before you start: Check the forecast, workspace temperature and available curing conditions. Reschedule the repair if you can't meet the product's requirements.
Common shortcuts and their consequences
- Skipping wax removal and cleaning: Contamination can prevent a reliable bond. Sanding over wax doesn't count as removing it.
- Leaving a glossy bonding surface: Poor keying gives the repair less suitable material to grip. Preparation needs to reach sound, appropriately abraded laminate.
- Overloading the cloth: Resin-rich patches add weight without equivalent strength. Fully wetted cloth shouldn't sit beneath unnecessary puddles.
- Working over residual moisture: A dry-looking surface can conceal water below it. Don't seal a board merely because your planned surf is approaching.
- Rushing the cure: A firm outer surface isn't permission to ignore the manufacturer's cure requirements.
- Skipping final levelling: Raised edges leave the job unfinished, but aggressive sanding can also remove reinforcement you've just added.
Cold conditions and damp working areas make improvisation tempting. Don't compensate by changing a mixing ratio or inventing an exposure time; use the specified method under suitable conditions.
Keep the distinction between application time, curing and readiness for use clear. A quick application is convenient, but the board still needs to meet the product's finishing and cure requirements before you take it surfing.
Preventing Damage and Knowing When to Call a Pro
The most common damage customers describe to us starts with mishandling outside the surf. Doorways, unloading, storage and hard surfaces deserve as much attention as the paddle-out.
Better handling won't prevent every ding, but it removes avoidable repair jobs.
Protect the board between sessions
Start when the board arrives. Surf Industries' unpacking guidance explains that honeycomb packing protects against transit knocks, recommends checking the outer box before accepting delivery and advises refusing a damaged board and contacting the seller promptly.
Photograph suspected transit damage and retain the relevant packaging while you speak with the seller. Don't rush to repair a newly delivered board before documenting its condition.
- Carry with control: Use both hands where practical and check clearance around doors, walls and the car.
- Pad it for transport: Choose protection that suits the board and the way you move it.
- Store it deliberately: Keep it away from hard contact points, direct sun and places where it can fall.
- Check the rack: Support the board without concentrated pressure or sharp contact.
The unpacking guidance also recommends a padded, heat-resistant bag between uses. Our surfboard bag guide can help you choose suitable protection, but a bag still needs careful handling.
Choose help before making the damage bigger
Structural cracks, delamination, fin-box damage and core work belong with a specialist such as the Boardroom in Gisborne. Bring an uncertain board in for guidance or a professional referral rather than opening the damage further to find out what's inside.
For an appropriate minor ding, choose a compatible kit and give preparation the time it needs. For anything outside that boundary, the useful next purchase may be professional repair work, not another tube of resin.
Blitz Surf Shop sells solar-cure repair kits and repair essentials, and our team can help you choose an option for minor damage. Visit Blitz Surf Shop online or bring your board into the Gisborne shop for kit advice or a referral to the Boardroom for professional repairs.


