

You know the feeling. You come in from a decent session, flip the board over, and the fin that felt a bit odd on the last wave is now clicking in the box. Maybe it's a side fin on a shortboard you surf every week at Wainui. Maybe it's a Futures setup that got knocked loading gear into the ute. Either way, once a fin box starts moving, you're no longer dealing with a cosmetic scratch. You're dealing with a structural repair.
Most surfers wait too long here. They tighten a screw, jam the fin back in, or tell themselves it can wait until the weather turns. Sometimes that buys you another paddle-out. Sometimes it turns a clean box swap into a much uglier job because water gets into the foam, the laminate starts lifting, and the area around the cluster loses its strength. Good surfboard fin box repair starts with two things: a calm diagnosis and the right materials for the board you own.
When the Fin Stops Holding and What to Do Next
It usually happens at the wrong time. You load up off the bottom, put pressure through the tail, and the board lets go under your back foot because the fin box has started moving. The first clue is often a click. The second is that washed-out feeling that doesn't match the wave.

If you're standing in the car park looking at a loose fin, you've really got three choices over the next day or two. Keep surfing it with a temporary hold, pull the fin and park the board, or commit to a proper repair. The first option is the one regrets.
Triage the board before you make it worse
Start simple.
- Remove the fin: Don't leave it under load if the box is already compromised.
- Dry the area: Shake out any water, stand the board fin-side down somewhere dry, and keep it out of direct punishment.
- Photograph the damage: Get a straight-on shot and an angle from the rail side. That helps later when you're checking whether the crack is only at the lip or whether the whole box has shifted.
A lot of surfers who ride both surfboards and SUPs already understand how much a fin changes hold, release, and tracking. That's why broader paddleboard fin performance tips are worth a look too. Different craft, same truth. If the fin connection isn't right, the board won't feel right.
Practical rule: If the fin box is moving, don't surf it again until you know whether the movement is in the fin, the screw, or the structure around the box.
Know the likely path from here
Sometimes the problem is just hardware. Sometimes the box is cracked but still bonded. Sometimes the foam underneath has taken a hit and the whole assembly needs to come out. If you're not even sure what fin system you're looking at, a quick skim through this guide to surf fins in NZ will help you identify what should be in the board before you start pulling parts apart.
What matters now is resisting the cheap shortcut. Tape isn't a repair. Extra screw pressure isn't a repair. Smearing random resin over the slot definitely isn't a repair. The rest of the job depends on spotting the failure properly before any cutting starts.
Spotting the Damage Before You Cut Anything
The fastest way to ruin a simple job is to attack the board before you know what failed. A loose fin doesn't always mean a full fin box replacement. Sometimes the fin is the problem. Sometimes the screw is. Sometimes the slot has cracked internally and the outside still looks tidy.
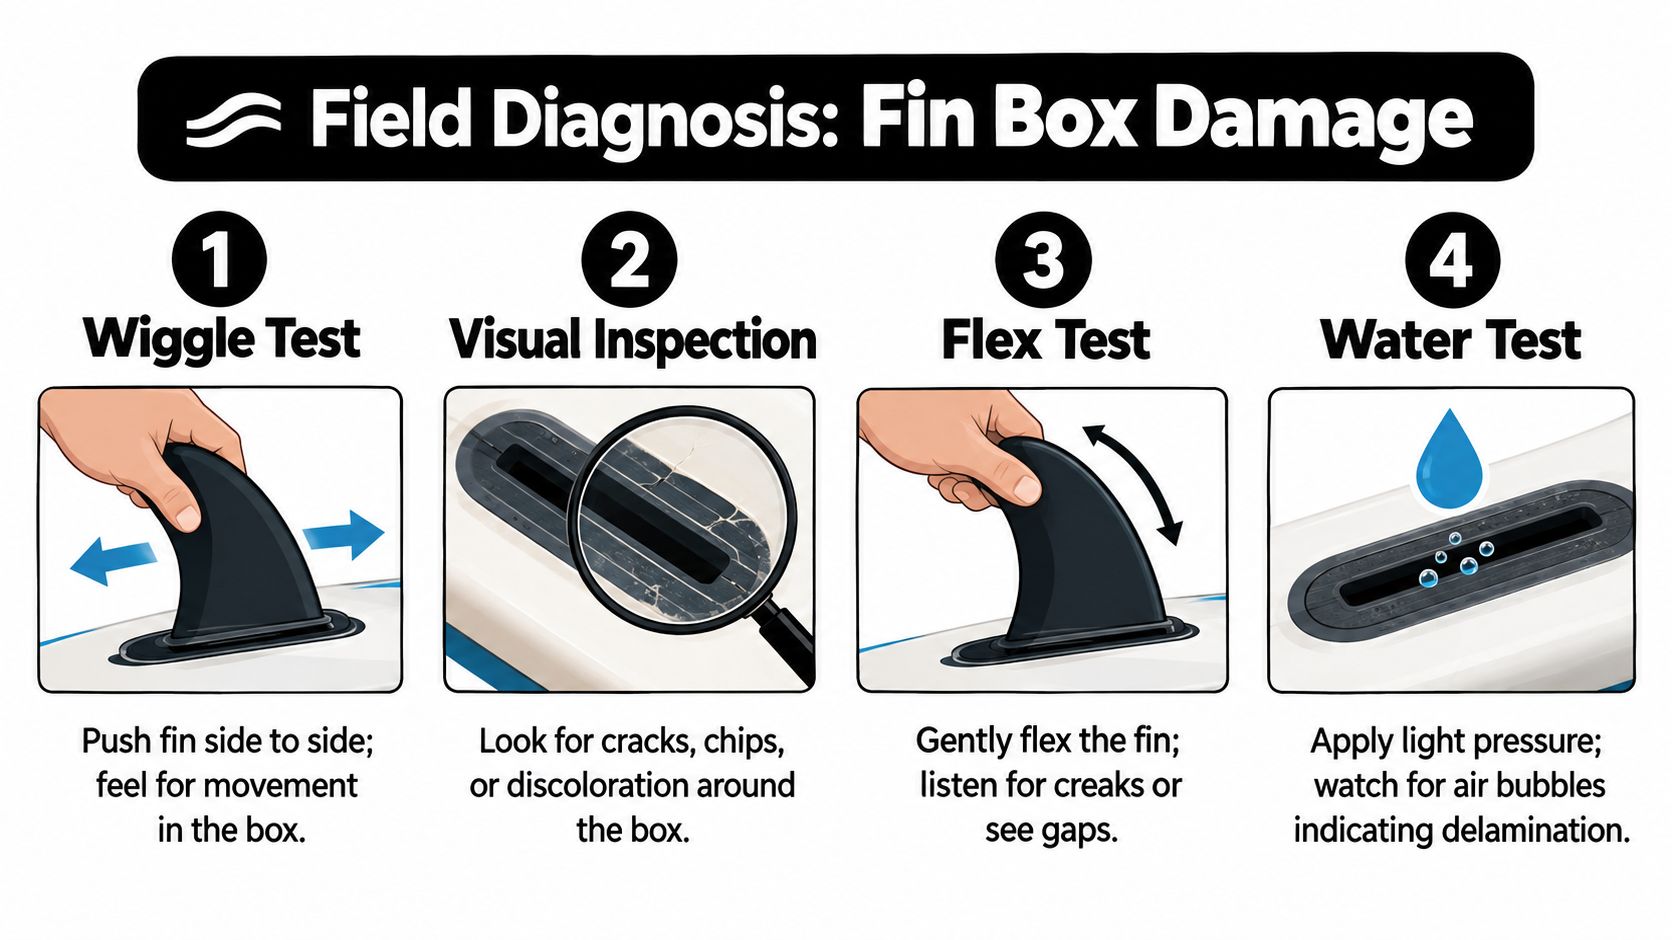
Start with the wiggle test
Install the fin if it still seats safely, then push it side to side with controlled pressure. You're trying to feel where the movement is coming from.
- Only the fin moves: You may be dealing with worn tabs, stripped grub screws, or a poor fin fit.
- The whole box moves with the fin: That's structural. Stop there.
- You hear creaking under pressure: That often points to glass separation or damaged foam under the flange.
Then run your thumb around the perimeter. Good glass feels hard and continuous. Softness, crunching, or a lip you can catch with a fingernail usually means the crack goes deeper than the surface.
A lot of avoidable gear damage starts with small handling errors, rushed setups, and forcing parts that don't fit cleanly. Common mistakes new surfers make with their surf equipment covers that side of it well, especially if you've inherited a used board with mixed hardware.
Four failure modes worth checking
Here's the short list I look for first:
-
Stripped FCS grub screws
The box may still be solid, but the fin won't lock properly. -
A cracked tab seat inside the slot
The outside can look fine while the internal support has failed. -
A sheared piece lodged in a Futures box
That can stop the fin seating fully and mimic a bigger problem. -
Soft foam under a cracked laminate
This is the one that turns into a proper rebuild.
Later in the inspection, visual clues matter more than people think. Yellowed cloth around the edge, star cracks radiating away from the box, and a dull ring in the laminate all suggest the impact spread load beyond the slot itself.
You can also watch this diagnosis process in action before cutting anything:
If the box moves, the foam feels soft, or the surrounding glass has lifted well beyond the box edge, treat it as a full removal and replacement job.
Tools, Resins, and Workspace Setup for the Job
Fin box jobs fail for boring reasons. Wrong resin, dusty cavity, rushed cure, poor alignment. The actual cutting and glassing isn't the hard part. The discipline is.
The kit that makes the job possible
You don't need a factory, but you do need the right bench setup and a few tools that let you work cleanly.
- Dremel with cutoff wheels: For trimming damaged lips and controlled cuts.
- Surform plane: Useful when you need to fair filler without gouging the blank.
- 80 and 120 grit wet/dry paper: Coarse enough to key the repair, fine enough to tidy it.
- Razor scraper and sharp knife: For trimming cloth and cleaning cured edges.
- Mixing cups and sticks: Keep resin batches organised.
- Nitrile gloves and a dust mask: Resin dust and foam dust aren't worth breathing.
If you're collecting materials in one go, a surfboard repair kit is a sensible starting point for the small consumables. It won't replace judgement, but it saves hunting around for cups, cloth, filler, and resin basics.
Match the resin to the board
This is the rule people ignore once, then never ignore again. Polyester resin is generally used on PU/poly boards. Epoxy systems are used on epoxy/EPS boards. New Zealand repair guidance and local product listings separate fin-plug, fin-box, epoxy/EPS, and glass-on fin repairs for a reason, and NZ repair kits are sold in both polyester and epoxy-specific formats because compatibility matters (NZ surfboard repair guidance and product examples).
If you use the wrong resin family, the bond can fail or the foam can react badly. On a fin box repair, that mistake sits right under load.
Resin family compatibility for PU vs Epoxy boards
| Board Construction | Resin Type | Catalyst | Cloth Weight | Cure Window |
|---|---|---|---|---|
| PU / polyester board | Polyester laminating resin | MEKP | Match the original repair schedule where possible | Depends on product and workshop conditions |
| Epoxy / EPS board | Epoxy resin | Correct hardener ratio for the system | Match the original repair schedule where possible | Depends on product and workshop conditions |
Set up the workspace before resin comes out
A flat bench matters because fin alignment matters. Warm conditions help because cold resin gets sluggish and cures badly. I like the room properly ventilated and clear of dust, pets, and random traffic. Wet layups and wandering cat hair don't mix.
NZ suppliers now list FCS II, Futures/Fusion, single-fin, epoxy/EPS, and SUP fin-box parts and repairs, which is helpful, but it also means you need to match the replacement box to the fin system before grinding anything out (NZ fin system parts and repair categories). Dry-fit first. Always.
Removing and Replacing an FCS II or Futures Fin Box
This is the point where patience saves boards. Mark the repair boundary with tape before you start grinding. That simple step stops the job spreading because you kept chasing tiny cracks further into good laminate.
FCS II route
FCS II repairs can be fiddly because the visible damage doesn't always show you what's happening below the flange. If the box has rivet-style grub screws or damaged hardware, remove or drill them cleanly first. Don't chew up the surrounding plastic trying to save a part that's already dead.
Then apply gentle heat. You're not cooking the board. You're softening the old bond enough to work a sharp chisel under the tabs and lift the box without tearing up extra foam.
- Keep the chisel flat: The goal is separation, not excavation.
- Lift in stages: One corner at a time is safer than brute force.
- Stop if it binds: More heat is the answer, not more levering.
If you're replacing the whole setup, it also helps to understand how the fin itself is meant to seat and engage. This Futures fins guide is useful for checking hardware assumptions, even if you're mainly comparing systems before choosing a replacement.
Futures and Fusion route
Futures or Fusion boxes often need more perimeter cleanup. Chase out the screws first if the install uses them, then grind the perimeter ring down until you expose the flange clearly. A coarse disc cuts quickly, but quick hands wreck blanks, so slow down and watch depth.
Once the flange is exposed, chisel it off in segments. Keep the blade plane parallel to the board skin. If you angle downward, you'll dig into the foam and create extra fill work.
What to check before glassing
Before any resin goes near the cavity, dry-fit the new box.
Check these points in order:
- The box sits square in the cavity
- The fin seats fully without rocking
- Tabs, screws, or retention points engage properly
- The alignment matches the original toe-in and cant
A local surf industry repair guide lays out the repair stack clearly: sand back with 40-grit, rebuild with a Q-cell, Cabosil, or Aerosil filler paste, then glass with 6 oz and 4 oz cloth before sanding and hot-coating (broken fin box repair stack). The exact layup can vary with the board and damage, but the underlying mechanics don't.
Vacuum the cavity, mask the surrounding board, and make sure the slot stays clean. Resin in the fin track is one of the oldest self-inflicted wounds in surfboard fin box repair.
Glassing Over the New Box and Curing It Right
Once the new box fits properly, the job turns into a lamination problem. That means bond quality, fibre placement, and cure discipline. Most weak repairs come from one of three errors: starved cloth, trapped air, or a contaminated slot.
Build the base properly
The cavity needs to be rebuilt so the box sits on solid material, not voids. I use a filler mix thick enough to hold shape and support the flange. Local repair guidance in NZ points the same way. Remove damaged material, rebuild the cavity, bond the new box, glass over it, then cut and clean the slot only after cure. It also flags the two common disasters: using the wrong resin family and letting resin flow into the slot that still needs to accept the fin after curing (NZ fin-box repair method and resin compatibility).
Tape across the slot before setting the box. Press the box down evenly and check the seating line from rail to rail.
Laminate for strength, not looks
A clean repair doesn't need excess resin. It needs cloth doing the work.
- First layer: Lay cloth over the flange and feather it beyond the perimeter.
- Second layer: Rotate the weave direction for better cross-support.
- Squeegee firmly: Push out bubbles and excess resin before it gels.
If you want a plain-language refresher on fibreglass repair habits, how to mend fibreglass gives a useful overview of the basics that still apply here.
A glossy patch can still be weak. Strength comes from sound filler, proper cloth contact, and a full cure.
Let it cure, then cut the slot cleanly
Rushing this part is where tidy jobs get ugly. If you're using UV resin systems for suitable PU repairs, understand the product and exposure window before you start. If you're working with epoxy, leave it alone long enough to harden through, not just skin over. This UV resin NZ guide is handy if you're deciding whether a UV-cure product suits the board and the repair style.
After cure, reopen the slot carefully with a razor saw, old fin guide, or a purpose cutter. Then sand the patch flush in stages until it blends back into the bottom without creating a low spot around the box. If the fin drops in cleanly and seats without force, you've done the hard part right.
DIY Cost and Time Versus a Professional Repair
A lot of fin box jobs go wrong before the resin is even mixed. Someone sees a loose FCS II or Futures box, buys a few supplies, then realises halfway through that the board is epoxy, the router bit is wrong, or the tail foam is softer than it looked. That is usually the point where a $40 idea turns into a $200 problem.
For a straightforward, contained replacement, DIY can still stack up. It makes the most sense if you already own the tools, you know how to keep cant and depth consistent, and you are repairing a board where a tidy structural result matters more than a showroom finish. If you are buying everything from scratch for one repair, shop pricing in NZ starts looking reasonable very quickly.
What NZ pricing looks like
NZ repairers charge fin box work as a separate structural repair, and that is fair. South Pacific Surf lists Future fin box repair at $110 and FCS2 fin box repair at $120 to $140 (South Pacific Surf repair pricing). Sadhana's repair menu lists 1 Futures/Fusion Box/FCSII repair at NZ$155, 2 at NZ$210, and an 8" and 10" Longboard Box at NZ$195 (Sadhana surfboard repairs).
Those numbers line up with what I'd expect around NZ. A clean single-box replacement on a standard shortboard is one price. Add crushed foam, extra glass work, colour matching, or multiple boxes in the tail, and the job moves up fast.
Side-by-side: DIY versus shop rates
The DIY cost is rarely just resin and a new box. Count the box itself, resin that matches the board construction, cloth, filler, sanding discs, tape, mixing gear, and whatever you need to cut the cavity cleanly. On a PU board, polyester or UV-cure systems can be workable in the right repair. On an EPS or epoxy board, polyester is the wrong call and can ruin the foam. That compatibility mistake is one of the most expensive shortcuts in home repairs.
DIY vs Professional Fin Box Repair Cost and Time
| Factor | DIY Repair | Professional Repair |
|---|---|---|
| Up-front cost | Lower if tools are already on hand and you only need parts and consumables | Higher cash price, but labour, materials, and setup are included |
| Time required | Usually spread over cutting, fitting, laminating, curing, recutting the slot, and sanding | Drop-off is quick. Total turnaround depends on the repair queue |
| Alignment risk | Yours to manage, including cant, depth, and fore-aft placement | Usually handled with jigs, templates, and a level bench |
| Resin compatibility | You must match the board, PU versus epoxy/EPS | Repairer chooses the correct system |
| Finish quality | Depends on your lamination and sanding discipline | Usually more consistent, especially around the patch edge |
| If the first attempt fails | You buy more parts and do the job twice | The repairer usually deals with corrections inside the quoted scope |
My rule is simple. DIY suits a beater or backup board when the damage is localised and the surrounding foam is still solid. A newer shortboard, a good step-up, or anything with damage spreading beyond the box is where paying for a proper repair often costs less than fixing a bad first attempt. If you open it up and the job is bigger than expected, stop there and hand it to a shop such as Blitz repair service rather than burying wet foam and hoping the fin holds.
Pro Warning Signs and Where to Get Help in NZ
Some jobs should stop the moment you uncover them. A fin box repair becomes a different class of work when the damage extends into the board structure around it. At that point, the issue isn't just replacing plastic. It's rebuilding strength and keeping the board true under load.
Signs the job has outgrown DIY
Watch for these:
- Delamination spreading beyond the box footprint: The skin has lost its bond to the foam.
- Soft or wet foam: The board may need drying time and deeper excavation.
- Stringer damage near the cluster: Alignment and strength become much harder to preserve.
- Cracks between fin boxes: Load has travelled through the tail section, not just one insert.
Those are the repairs that punish rushed work. Grinding epoxy dust, handling solvents, and trying to recover original cant and toe-in without proper support isn't where most home jobs improve with optimism.
Parts, materials, and the point to stop
If you're still in the DIY camp, line up the hardware before you touch the board. That means matching FCS II, Futures/Fusion, single-fin, or SUP box parts to the board, then checking you've got the correct resin system, cloth, filler, and clean sanding consumables. Keep the process simple. Diagnose accurately, prep cleanly, laminate neatly, and stop the minute the surrounding structure looks worse than the original crack.
If the board needs a proper assessment, hand it over before a manageable repair turns into a cut-out and rebuild. Blitz Surf Shop offers in-house repair service for epoxy and polyester boards, and it also makes sense to identify any replacement hardware or repair materials you'll need before the work starts. That gives you a clean path whether you're sourcing parts yourself or passing the board across the counter for repair.
If your fin box is loose, cracked, or torn out, Blitz Surf Shop can help from both directions. You can sort the parts and repair essentials for a careful DIY attempt, or get the board assessed for a proper epoxy or polyester repair before the damage spreads through the tail.


